Raspberry Pi IoT Server Free: Your Ultimate Guide To Building An Affordable Smart Home System
Hey there, tech enthusiasts! If you're looking to dive into the world of Internet of Things (IoT) without breaking the bank, you're in the right place. Raspberry Pi IoT server free projects have been gaining massive popularity lately, and for good reason. Whether you're a beginner or an advanced user, this tiny yet powerful device opens up endless possibilities for creating smart solutions. So, buckle up and get ready to explore how you can turn your Raspberry Pi into a game-changing IoT server without spending a fortune!
Now, let's be real—IoT sounds fancy, but it doesn't have to be expensive. With Raspberry Pi, you can build a fully functional IoT server that connects all your smart devices without shelling out big bucks. This nifty little board has become the go-to choice for hobbyists and professionals alike, thanks to its versatility and affordability. From controlling smart lights to automating your home security system, Raspberry Pi can do it all.
But why stop at just buying the hardware? By leveraging free software and open-source tools, you can create a robust IoT server that rivals commercial solutions. This guide will walk you through everything you need to know, from setting up your Raspberry Pi to deploying IoT applications that make your life easier. Ready to unlock the potential of your Raspberry Pi? Let's get started!
Read also:Whitney Mathers A Closer Look At Her Life And Legacy
Table of Contents
- What is Raspberry Pi?
- Benefits of Using Raspberry Pi for IoT
- Getting Started with Raspberry Pi IoT Server
- Hardware Requirements
- Software Setup for IoT Server
- Popular IoT Applications for Raspberry Pi
- Security Considerations for Raspberry Pi IoT Server
- Troubleshooting Tips
- Cost Comparison: Raspberry Pi vs. Commercial IoT Servers
- Conclusion: Why Raspberry Pi is the Future of IoT
What is Raspberry Pi?
Raspberry Pi is more than just a tiny computer; it's a gateway to endless innovation. This credit-card-sized device was originally designed to promote computer science education, but it quickly became a favorite among tech enthusiasts worldwide. With its low cost and incredible capabilities, Raspberry Pi has revolutionized the way we approach technology.
Here's the deal: Raspberry Pi is basically a mini-computer that can run Linux-based operating systems. It comes equipped with a variety of ports, including USB, HDMI, and Ethernet, making it easy to connect peripherals and expand its functionality. Plus, it supports Wi-Fi and Bluetooth, which are essential for IoT applications.
Why Choose Raspberry Pi for IoT Projects?
Raspberry Pi stands out in the IoT world for several reasons:
- Cost-Effective: You can get a Raspberry Pi for as little as $35, which is a steal compared to other IoT solutions.
- Flexible: Its compatibility with various programming languages and platforms makes it a versatile tool for any project.
- Community Support: With a massive community of users, you'll never run out of resources or tutorials to help you along the way.
Benefits of Using Raspberry Pi for IoT
Let's break it down—why should you use Raspberry Pi as your IoT server? The answer is simple: it offers unmatched value for the price. Unlike commercial IoT servers that come with hefty price tags and limited customization options, Raspberry Pi gives you full control over your setup. Here are some key benefits:
First off, Raspberry Pi is super easy to set up. Even if you're new to IoT, you can get your server up and running in no time. Plus, its open-source nature means you can experiment with different configurations until you find the perfect setup for your needs.
Another big advantage is scalability. As your IoT projects grow, you can easily add more sensors, devices, and applications to your Raspberry Pi server without worrying about compatibility issues. And let's not forget the cost savings—you can build a fully functional IoT server for a fraction of the price of commercial solutions.
Read also:Philippine Leroybeaulieu Love And Marriage Through The Lens Of A Star
Environmental Impact
Raspberry Pi also has a smaller environmental footprint compared to traditional servers. Its low power consumption makes it an eco-friendly choice for your IoT projects. In a world where sustainability is becoming increasingly important, this is a huge plus.
Getting Started with Raspberry Pi IoT Server
Alright, let's talk about the first steps you need to take to set up your Raspberry Pi IoT server. Don't worry—it's not as complicated as it sounds. Here's a quick rundown of what you'll need to do:
- Choose Your Raspberry Pi Model: There are several models available, so pick the one that best suits your project requirements.
- Install an Operating System: Raspberry Pi OS is the most popular choice, but you can also use other Linux-based systems like Ubuntu.
- Set Up Your Network: Connect your Raspberry Pi to your Wi-Fi or Ethernet network to enable communication with other devices.
- Install IoT Software: Use platforms like Node-RED or Home Assistant to manage your IoT applications.
Once you've completed these steps, you'll have a solid foundation for building your IoT server. From here, you can start experimenting with different applications and customizations.
Hardware Requirements
Before you dive into setting up your Raspberry Pi IoT server, it's important to know what hardware you'll need. Here's a list of essentials:
- Raspberry Pi Board: Choose a model with sufficient processing power and memory for your project.
- MicroSD Card: You'll need this to store the operating system and your data. A 16GB card should suffice for most projects.
- Power Supply: Make sure you have a reliable power source that meets the requirements of your Raspberry Pi model.
- Network Adapter: If your Raspberry Pi doesn't have built-in Wi-Fi, you'll need a USB Wi-Fi adapter.
Optional accessories like a case, keyboard, and monitor can enhance your experience, but they're not strictly necessary for setting up your server.
Choosing the Right Raspberry Pi Model
With so many models available, selecting the right one can be overwhelming. Here's a quick guide:
- Raspberry Pi 4: Ideal for more demanding projects due to its powerful processor and support for multiple peripherals.
- Raspberry Pi 3: A solid choice for basic IoT applications, offering good performance at a lower price point.
- Raspberry Pi Zero: Perfect for lightweight projects or when portability is a priority.
Software Setup for IoT Server
Now that you have your hardware ready, it's time to focus on the software side of things. Setting up your Raspberry Pi IoT server involves installing the right operating system and configuring it for IoT applications.
Start by downloading Raspberry Pi OS from the official website and flashing it onto your microSD card using a tool like Balena Etcher. Once your Raspberry Pi is booted up, you can begin installing the necessary software for your IoT projects.
Some popular choices include:
- Node-RED: A visual programming tool that makes it easy to create complex IoT workflows.
- Home Assistant: A powerful platform for managing smart home devices and automations.
- Mosquitto: An open-source MQTT broker for secure communication between IoT devices.
Tips for Optimizing Performance
Here are a few tips to help you get the most out of your Raspberry Pi IoT server:
- Keep Your Software Updated: Regular updates ensure your system runs smoothly and securely.
- Monitor Resource Usage: Use tools like htop to keep an eye on CPU and memory usage.
- Automate Backups: Set up regular backups to prevent data loss in case something goes wrong.
Popular IoT Applications for Raspberry Pi
So, what can you actually do with your Raspberry Pi IoT server? The possibilities are endless! Here are some popular applications that showcase the versatility of this amazing device:
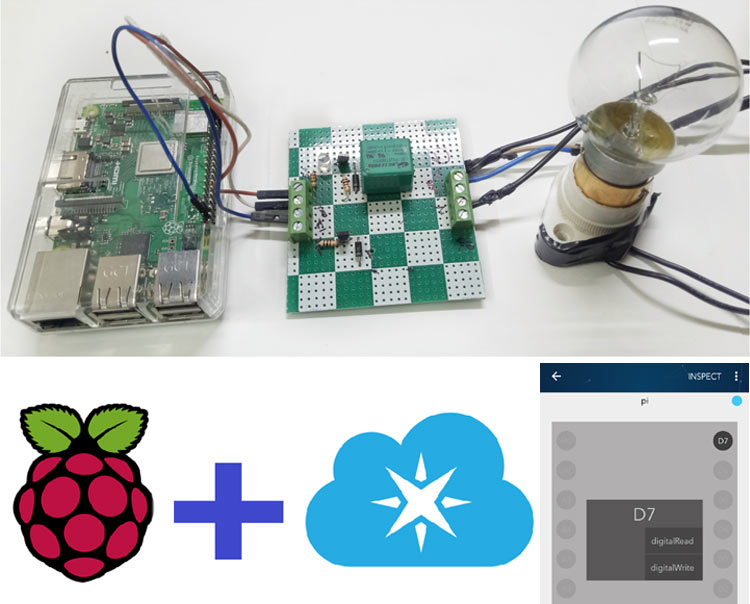
- Smart Home Automation: Control lights, thermostats, and security systems with ease.
- Environmental Monitoring: Use sensors to track temperature, humidity, and air quality.
- Smart Agriculture: Automate irrigation systems and monitor soil conditions for optimal crop growth.
Each of these applications can be tailored to fit your specific needs, making Raspberry Pi a truly customizable solution for IoT projects.
Real-World Examples
Let's take a look at some real-world examples of Raspberry Pi IoT projects:
- Smart Mirror: A mirror that displays weather updates, calendar events, and other useful information.
- Smart Garden: A system that waters plants automatically and alerts you when they need attention.
- Home Security System: A setup that uses cameras and motion sensors to keep your property safe.
Security Considerations for Raspberry Pi IoT Server
Security is a crucial aspect of any IoT project, and Raspberry Pi is no exception. While this device is incredibly powerful, it's also vulnerable to attacks if not properly secured. Here are some best practices to keep your Raspberry Pi IoT server safe:
- Change Default Passwords: Always change the default username and password to something strong and unique.
- Enable Firewall: Use tools like UFW to protect your server from unauthorized access.
- Regularly Update Software: Keep your operating system and applications up to date to patch any security vulnerabilities.
By following these guidelines, you can ensure that your Raspberry Pi IoT server remains secure and protected from potential threats.
Encryption and Authentication
Encryption and authentication are essential components of any secure IoT setup. Use protocols like SSL/TLS to encrypt data transmitted between devices, and implement strong authentication methods to verify user identities.
Troubleshooting Tips
No matter how careful you are, issues can still arise when working with Raspberry Pi. Here are some common problems and how to fix them:
- Wi-Fi Connectivity Issues: Check your network settings and ensure your Wi-Fi adapter is compatible with your Raspberry Pi model.
- Software Installation Errors: Make sure you're downloading software from trusted sources and follow installation instructions carefully.
- Performance Problems: If your server is running slow, try closing unnecessary applications and freeing up disk space.
Remember, troubleshooting is all about patience and persistence. Don't be afraid to seek help from the Raspberry Pi community if you're stuck on a problem.
Cost Comparison: Raspberry Pi vs. Commercial IoT Servers
When it comes to cost, Raspberry Pi has a clear advantage over commercial IoT servers. Here's a quick comparison:
| Aspect | Raspberry Pi | Commercial IoT Servers |
|---|---|---|
| Initial Cost | $35-$55 | $500-$2000+ |
| Scalability | High | Variable |
| Customization | Unlimited | Limited |
As you can see, Raspberry Pi offers significant cost savings without compromising on functionality. It's the perfect choice for anyone looking to build an IoT server on a budget.
Conclusion: Why Raspberry Pi is the Future of IoT
Article Recommendations