How To Use SSH IoT From Anywhere On Ubuntu And Windows For Free
Hey there, tech-savvy friends! Are you looking for a way to access your IoT devices securely from anywhere in the world without breaking the bank? Well, you're in the right place. Today, we’re diving deep into the world of SSH (Secure Shell) and exploring how you can harness its power to remotely manage your IoT devices on both Ubuntu and Windows—for free! Whether you're a seasoned developer or just starting out, this guide is going to be your go-to resource.
SSH is more than just a tool; it's a lifeline for anyone working with IoT devices. Imagine being able to troubleshoot your smart home setup while you're sipping coffee on the other side of the globe. Sounds pretty cool, right? In this article, we'll break down the steps you need to follow to set up SSH for your IoT devices on both Ubuntu and Windows systems. So grab your favorite beverage, sit back, and let's get started!
Before we jump into the nitty-gritty, let’s quickly set the scene. SSH isn’t just for big-shot enterprises. It’s a free and open-source solution that offers rock-solid security for remote access. This guide will walk you through every step, from installing SSH on your systems to configuring it for seamless IoT device management. No tech wizardry required—just some basic know-how and a willingness to learn.
Read also:A Deep Dive Into Julia Foxs Parents A Look Into Her Family Background
Understanding SSH and Its Role in IoT
Alright, let's kick things off by getting a solid grasp of what SSH actually is and why it's such a game-changer for IoT enthusiasts. SSH, or Secure Shell, is a cryptographic network protocol that lets you securely connect to and manage remote devices over an unsecured network. Think of it as a digital fortress that protects your data from prying eyes while you're accessing your IoT devices from anywhere.
Here’s why SSH is so important for IoT:
- Security: SSH encrypts all data exchanged between your local machine and the IoT device, ensuring that sensitive information stays private.
- Flexibility: You can access your devices from virtually any location with an internet connection.
- Cost-Effective: Unlike some proprietary solutions, SSH is completely free and open-source, making it accessible to everyone.
Now that we’ve covered the basics, let’s move on to the fun part: setting up SSH for your IoT devices on Ubuntu and Windows.
Setting Up SSH on Ubuntu for IoT Devices
Ubuntu is a favorite among developers for its stability and ease of use, so it’s no surprise that setting up SSH on this platform is a breeze. Here’s a step-by-step guide to get you up and running:
Step 1: Install OpenSSH Server
First things first, you’ll need to install the OpenSSH server on your Ubuntu machine. Open up your terminal and type the following command:
sudo apt update && sudo apt install openssh-server
Read also:Sephora In Florence Italy An Indepth Guide To Finding Beauty In The Heart Of Tuscany
This command updates your package list and installs the OpenSSH server, which is the backbone of your SSH setup.
Step 2: Start and Enable SSH Service
Once the installation is complete, you’ll want to make sure the SSH service is up and running. Use these commands:
sudo systemctl start ssh
sudo systemctl enable ssh
The first command starts the SSH service, while the second ensures it runs automatically every time your system boots up.
Step 3: Test Your SSH Connection
To verify that everything is working as it should, open a new terminal window and try connecting to your local machine using SSH:
ssh username@localhost
If you’re greeted with a password prompt, congratulations—you’ve successfully set up SSH on Ubuntu!
Configuring SSH for Remote Access
Now that you’ve got SSH up and running locally, let’s take it to the next level by enabling remote access. This is where the real magic happens, allowing you to manage your IoT devices from anywhere in the world.
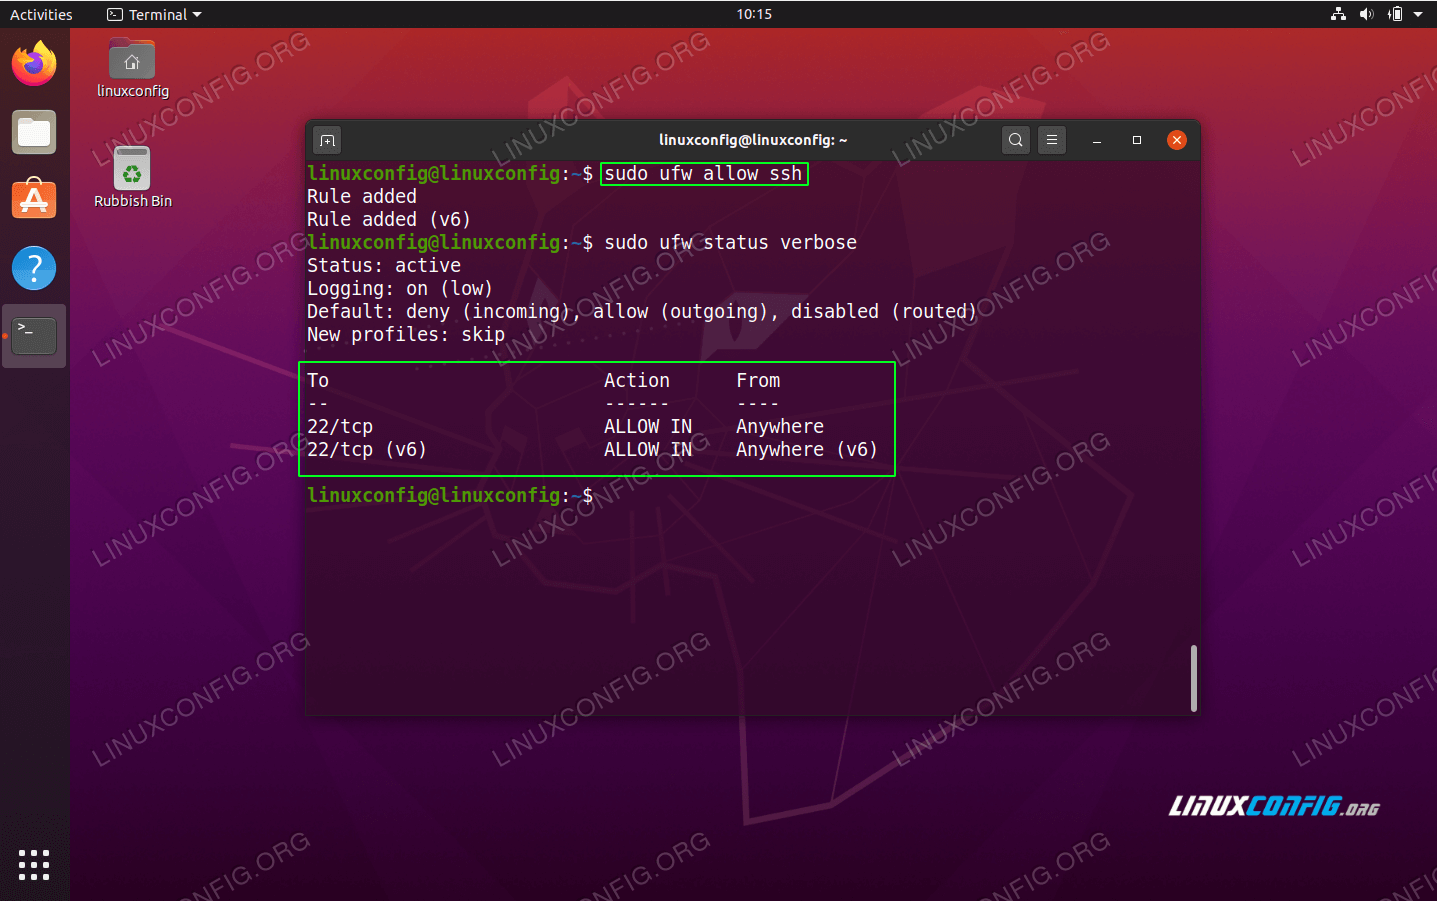
Step 1: Allow SSH Through Your Firewall
Depending on your firewall settings, you might need to explicitly allow SSH traffic. Use the following command to open port 22, which is the default port for SSH:
sudo ufw allow ssh
This simple step ensures that your firewall won’t block incoming SSH connections.
Step 2: Set Up Port Forwarding on Your Router
Port forwarding is a crucial step if you want to access your IoT devices from outside your local network. Log in to your router’s admin interface and configure it to forward incoming traffic on port 22 to your Ubuntu machine’s local IP address.
Pro Tip: If you’re worried about security, consider changing the default SSH port to something less obvious, like 2222. This adds an extra layer of protection against automated attacks.
Setting Up SSH on Windows for IoT Devices
While Ubuntu might be the go-to choice for many developers, Windows users don’t have to feel left out. Setting up SSH on Windows is just as straightforward, thanks to tools like OpenSSH and third-party clients like PuTTY.
Step 1: Enable OpenSSH Server on Windows
Windows 10 and later versions come with OpenSSH built-in, so all you need to do is enable it. Head over to Settings > Apps > Optional Features, and click on "Add a feature." Search for "OpenSSH Server" and install it.
Once the installation is complete, restart your system to apply the changes.
Step 2: Configure the OpenSSH Server
With the server installed, you’ll need to make a few tweaks to its configuration. Navigate to the following directory:
C:\ProgramData\ssh\
Here, you’ll find the sshd_config file, which controls how the SSH server behaves. Open it with a text editor and make any necessary adjustments, such as disabling password authentication in favor of public key authentication for added security.
Step 3: Test Your SSH Connection
Just like on Ubuntu, you can test your SSH setup by connecting to your local machine:
ssh username@localhost
If everything checks out, you’re good to go!
Connecting to IoT Devices from Anywhere
Now that you’ve got SSH up and running on both Ubuntu and Windows, it’s time to connect the dots and start managing your IoT devices from anywhere. Here’s how you can do it:
Step 1: Use a Dynamic DNS Service
Dynamic DNS (DDNS) allows you to assign a memorable domain name to your home IP address, making it easier to connect to your devices remotely. Services like No-IP and DuckDNS offer free DDNS solutions that work seamlessly with SSH.
Step 2: Secure Your Connection with Public Key Authentication
Instead of relying on passwords, which can be easily guessed or brute-forced, use public key authentication for added security. Generate a key pair on your local machine and copy the public key to your IoT device’s authorized_keys file.
Step 3: Automate with Scripts
For those who want to take things to the next level, consider writing scripts to automate common tasks, such as restarting services or updating firmware. This not only saves time but also reduces the risk of human error.
Troubleshooting Common SSH Issues
Even the best-laid plans can hit a snag from time to time. Here are some common SSH issues you might encounter and how to fix them:
- Connection Refused: Double-check your firewall settings and ensure that port forwarding is correctly configured on your router.
- Authentication Failed: Verify that your username and password are correct. If you’re using public key authentication, ensure that your public key is properly added to the authorized_keys file.
- Timeout Errors: This could be due to network congestion or a misconfigured router. Try increasing the SSH timeout value in your client settings.
Best Practices for Using SSH with IoT
Security should always be at the forefront of your mind when working with IoT devices. Here are some best practices to keep your setup safe and secure:
- Use Strong Passwords: Avoid using easily guessable passwords. If possible, disable password authentication altogether and rely solely on public key authentication.
- Keep Software Up to Date: Regularly update your SSH server and client software to patch any security vulnerabilities.
- Monitor Logs: Keep an eye on your SSH logs for any suspicious activity. Most modern SSH servers log all connection attempts, making it easy to spot potential threats.
Conclusion: Take Your IoT Game to the Next Level
And there you have it—a comprehensive guide to using SSH for IoT devices on both Ubuntu and Windows, completely free of charge! By following the steps outlined in this article, you’ve taken a significant step toward mastering remote device management. Remember, security is key, so always follow best practices to protect your devices from unauthorized access.
We’d love to hear your thoughts and experiences. Drop a comment below and let us know how this guide helped you. And if you found it useful, don’t forget to share it with your fellow tech enthusiasts. Until next time, happy coding and stay secure!
Table of Contents
- How to Use SSH IoT from Anywhere on Ubuntu and Windows for Free
- Understanding SSH and Its Role in IoT
- Setting Up SSH on Ubuntu for IoT Devices
- Configuring SSH for Remote Access
- Setting Up SSH on Windows for IoT Devices
- Connecting to IoT Devices from Anywhere
- Troubleshooting Common SSH Issues
- Best Practices for Using SSH with IoT
- Conclusion: Take Your IoT Game to the Next Level
Article Recommendations