Login IoT Device Behind Firewall Mac Free AWS
Alright, listen up, folks. If you're here, chances are you're scratching your head trying to figure out how to access an IoT device behind a firewall on your Mac without breaking the bank—or, worse, breaking AWS rules. Don’t worry, I’ve been there, and I know that feeling when you're stuck between security protocols, networking jargon, and limited resources. Let’s break it down, step by step, because navigating this world of IoT and cloud computing can feel like solving a Rubik’s Cube blindfolded. But hey, we’re about to make it simpler, faster, and more approachable.
So, what exactly are we talking about here? The keyword phrase login IoT device behind firewall Mac free AWS might sound complicated, but it’s really just about gaining access to your IoT devices while ensuring your network stays secure—all without spending a dime on premium tools. Whether you're managing smart home devices, running industrial IoT setups, or just experimenting with personal projects, getting this right is crucial. Let’s dive in and figure out how to do it right.
Before we go any further, let’s set the stage. This isn’t just another tech article filled with buzzwords. We’re going to walk you through everything you need to know, from understanding firewalls and AWS basics to configuring your Mac for seamless IoT access. By the end of this, you’ll not only know how to connect but also why certain methods work better than others. Sound good? Great. Let’s get started.
Read also:The Unbeatable Floyd Mayweather A Boxing Legend
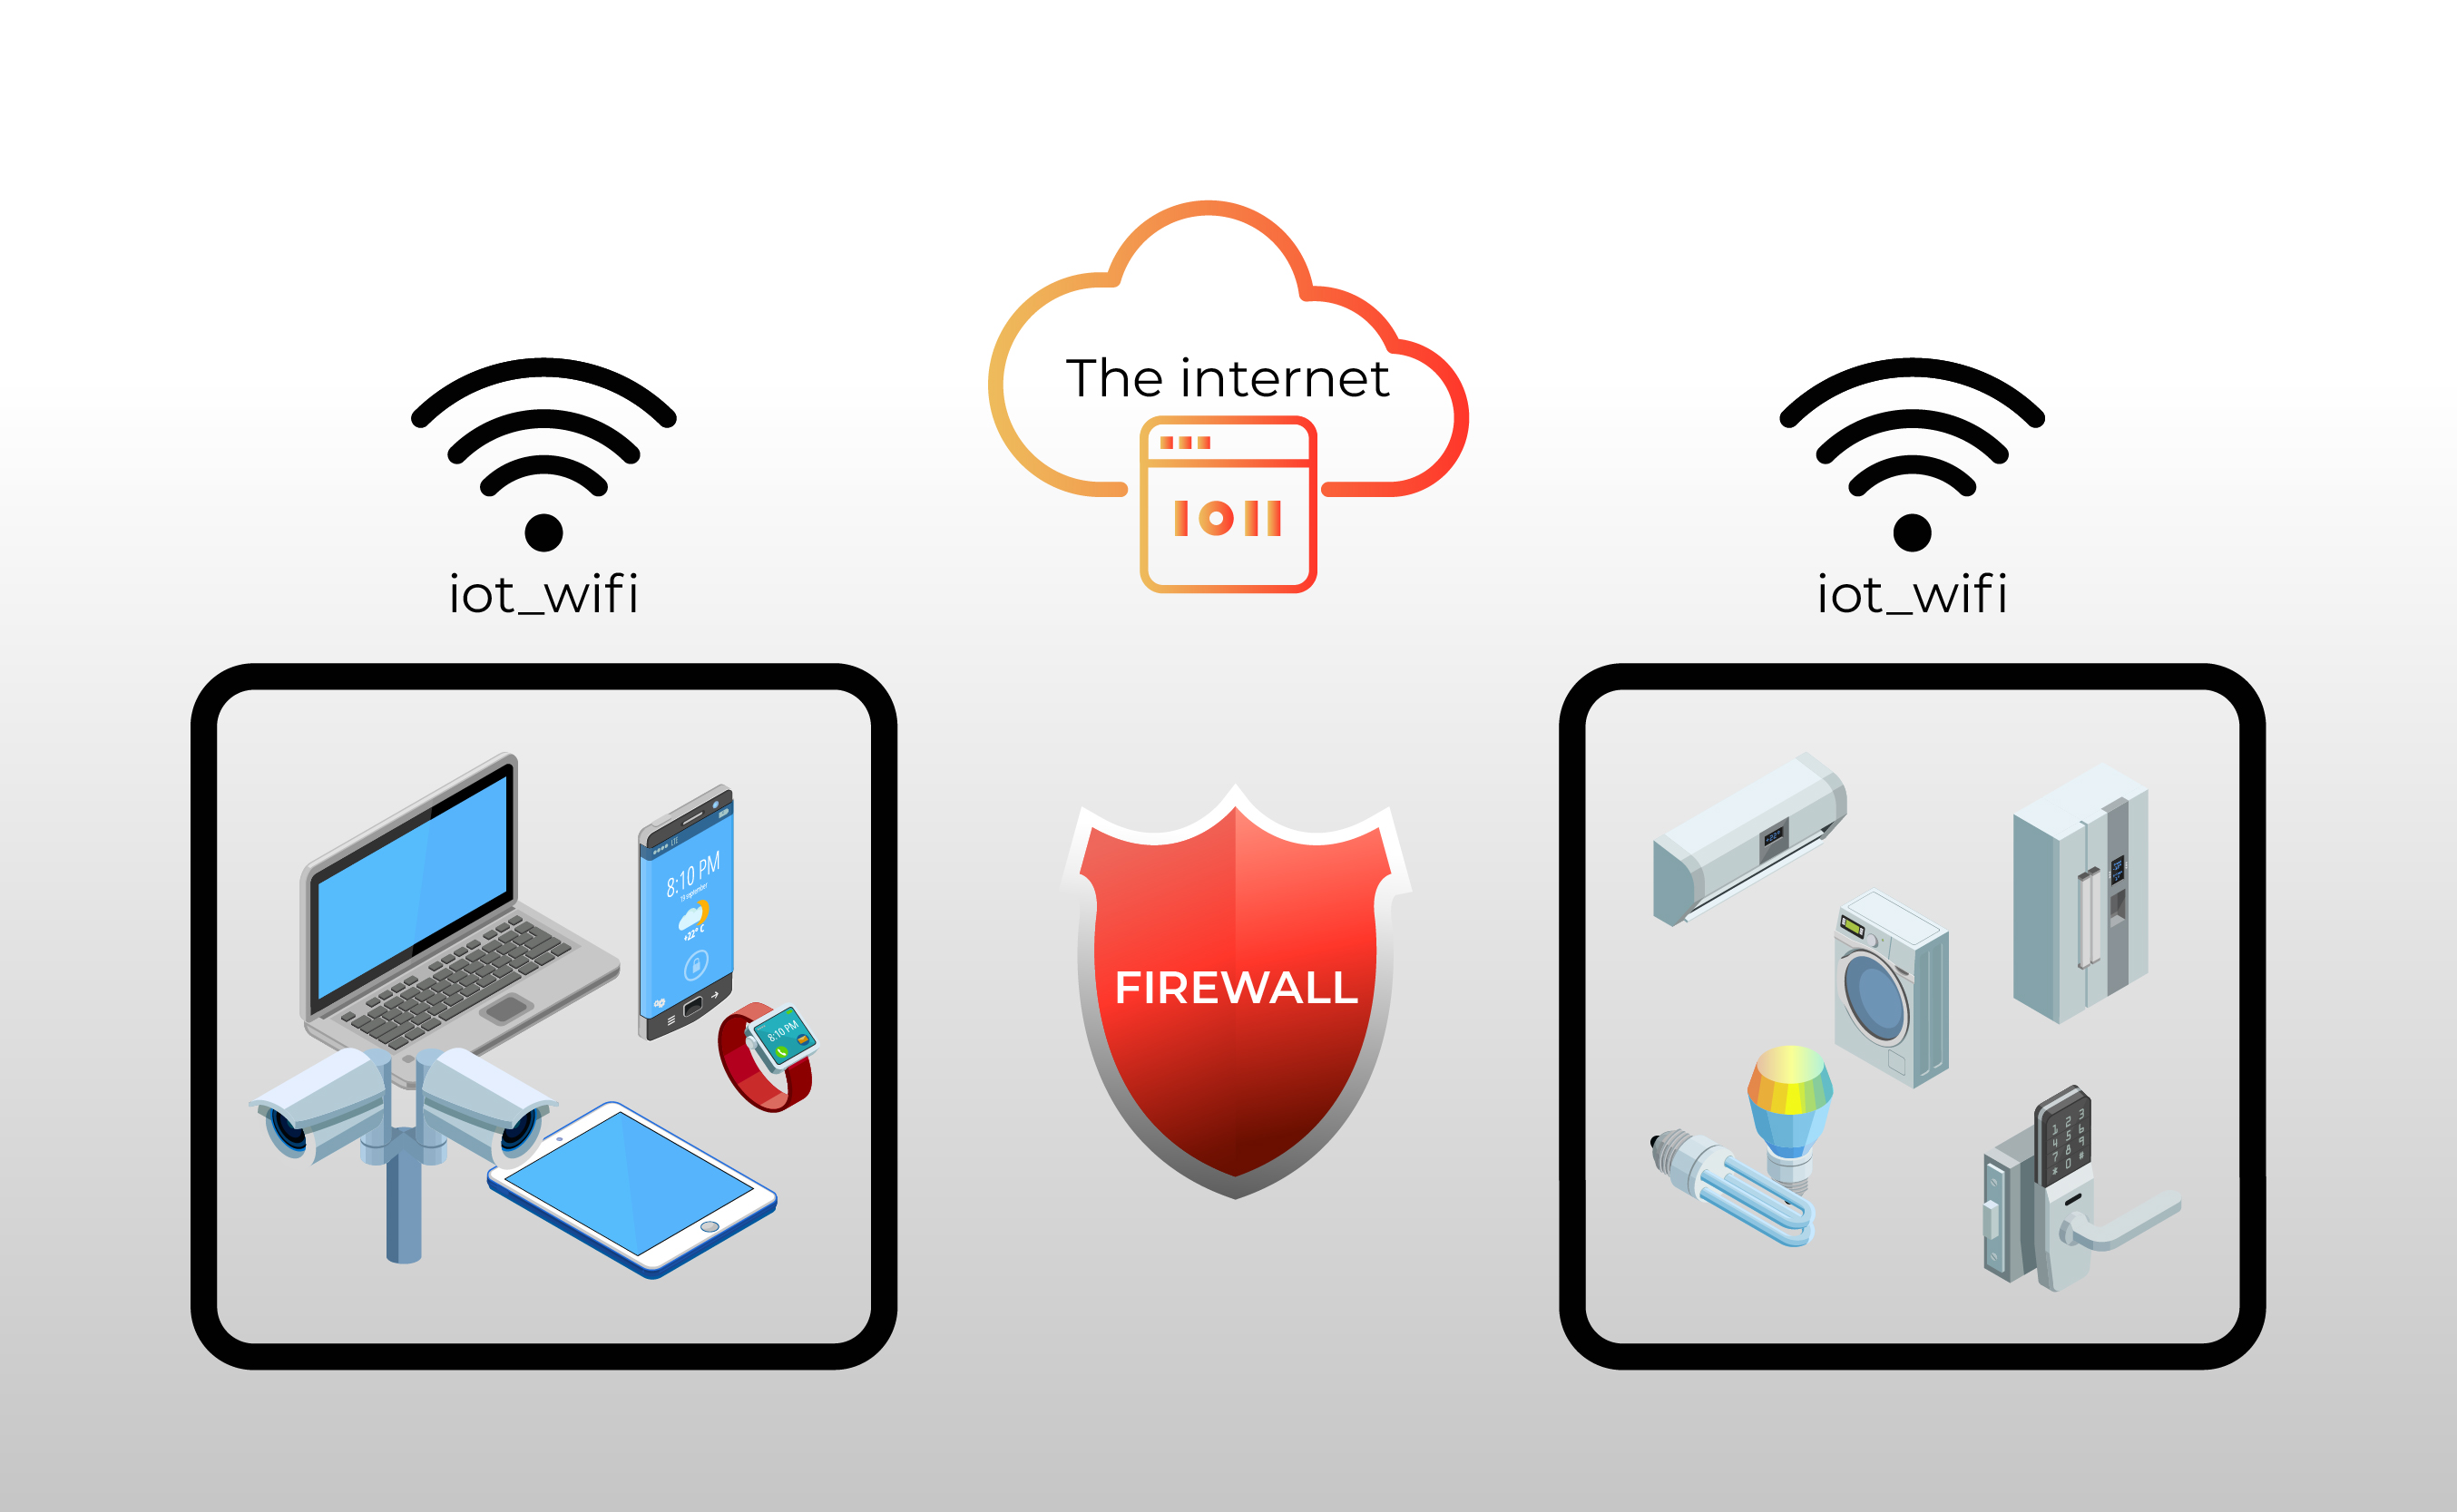
Understanding Firewalls and Their Role in IoT
Alright, let’s start with the basics. Firewalls are like the bouncers at a club—they decide who gets in and who doesn’t. When it comes to IoT devices, firewalls play a critical role in ensuring only authorized traffic gets through while blocking potential threats. But here’s the catch: sometimes, even legitimate connections can get blocked, especially if you're trying to access devices from outside your local network.
Now, why does this matter for IoT? Well, imagine you’ve got a smart thermostat or a security camera that you want to control remotely. Without proper firewall configuration, you might find yourself locked out, unable to access your device unless you’re physically connected to the same network. Not ideal, right?
Here’s the thing: firewalls aren’t just about blocking bad actors. They’re also about creating rules that allow specific types of traffic to pass through. In the context of IoT, this means setting up rules that permit your devices to communicate with external networks—like AWS—without compromising your security.
Types of Firewalls and Their Impact on IoT
Not all firewalls are created equal. There are different types, each with its own strengths and weaknesses:
- Network Firewalls: These are the most common and act as a barrier between your local network and the internet. They’re great for protecting your devices but can sometimes block legitimate IoT traffic.
- Application Firewalls: These focus on specific applications and protocols, making them ideal for fine-tuning access to IoT devices. They’re more flexible but require more configuration.
- Cloud Firewalls: These are managed by cloud providers like AWS and offer scalable protection for IoT setups. They’re particularly useful if you’re hosting your devices on AWS.
Understanding which type of firewall you’re dealing with is key to configuring your IoT devices correctly. Each has its own quirks, so knowing what you’re working with can save you a lot of headaches down the line.
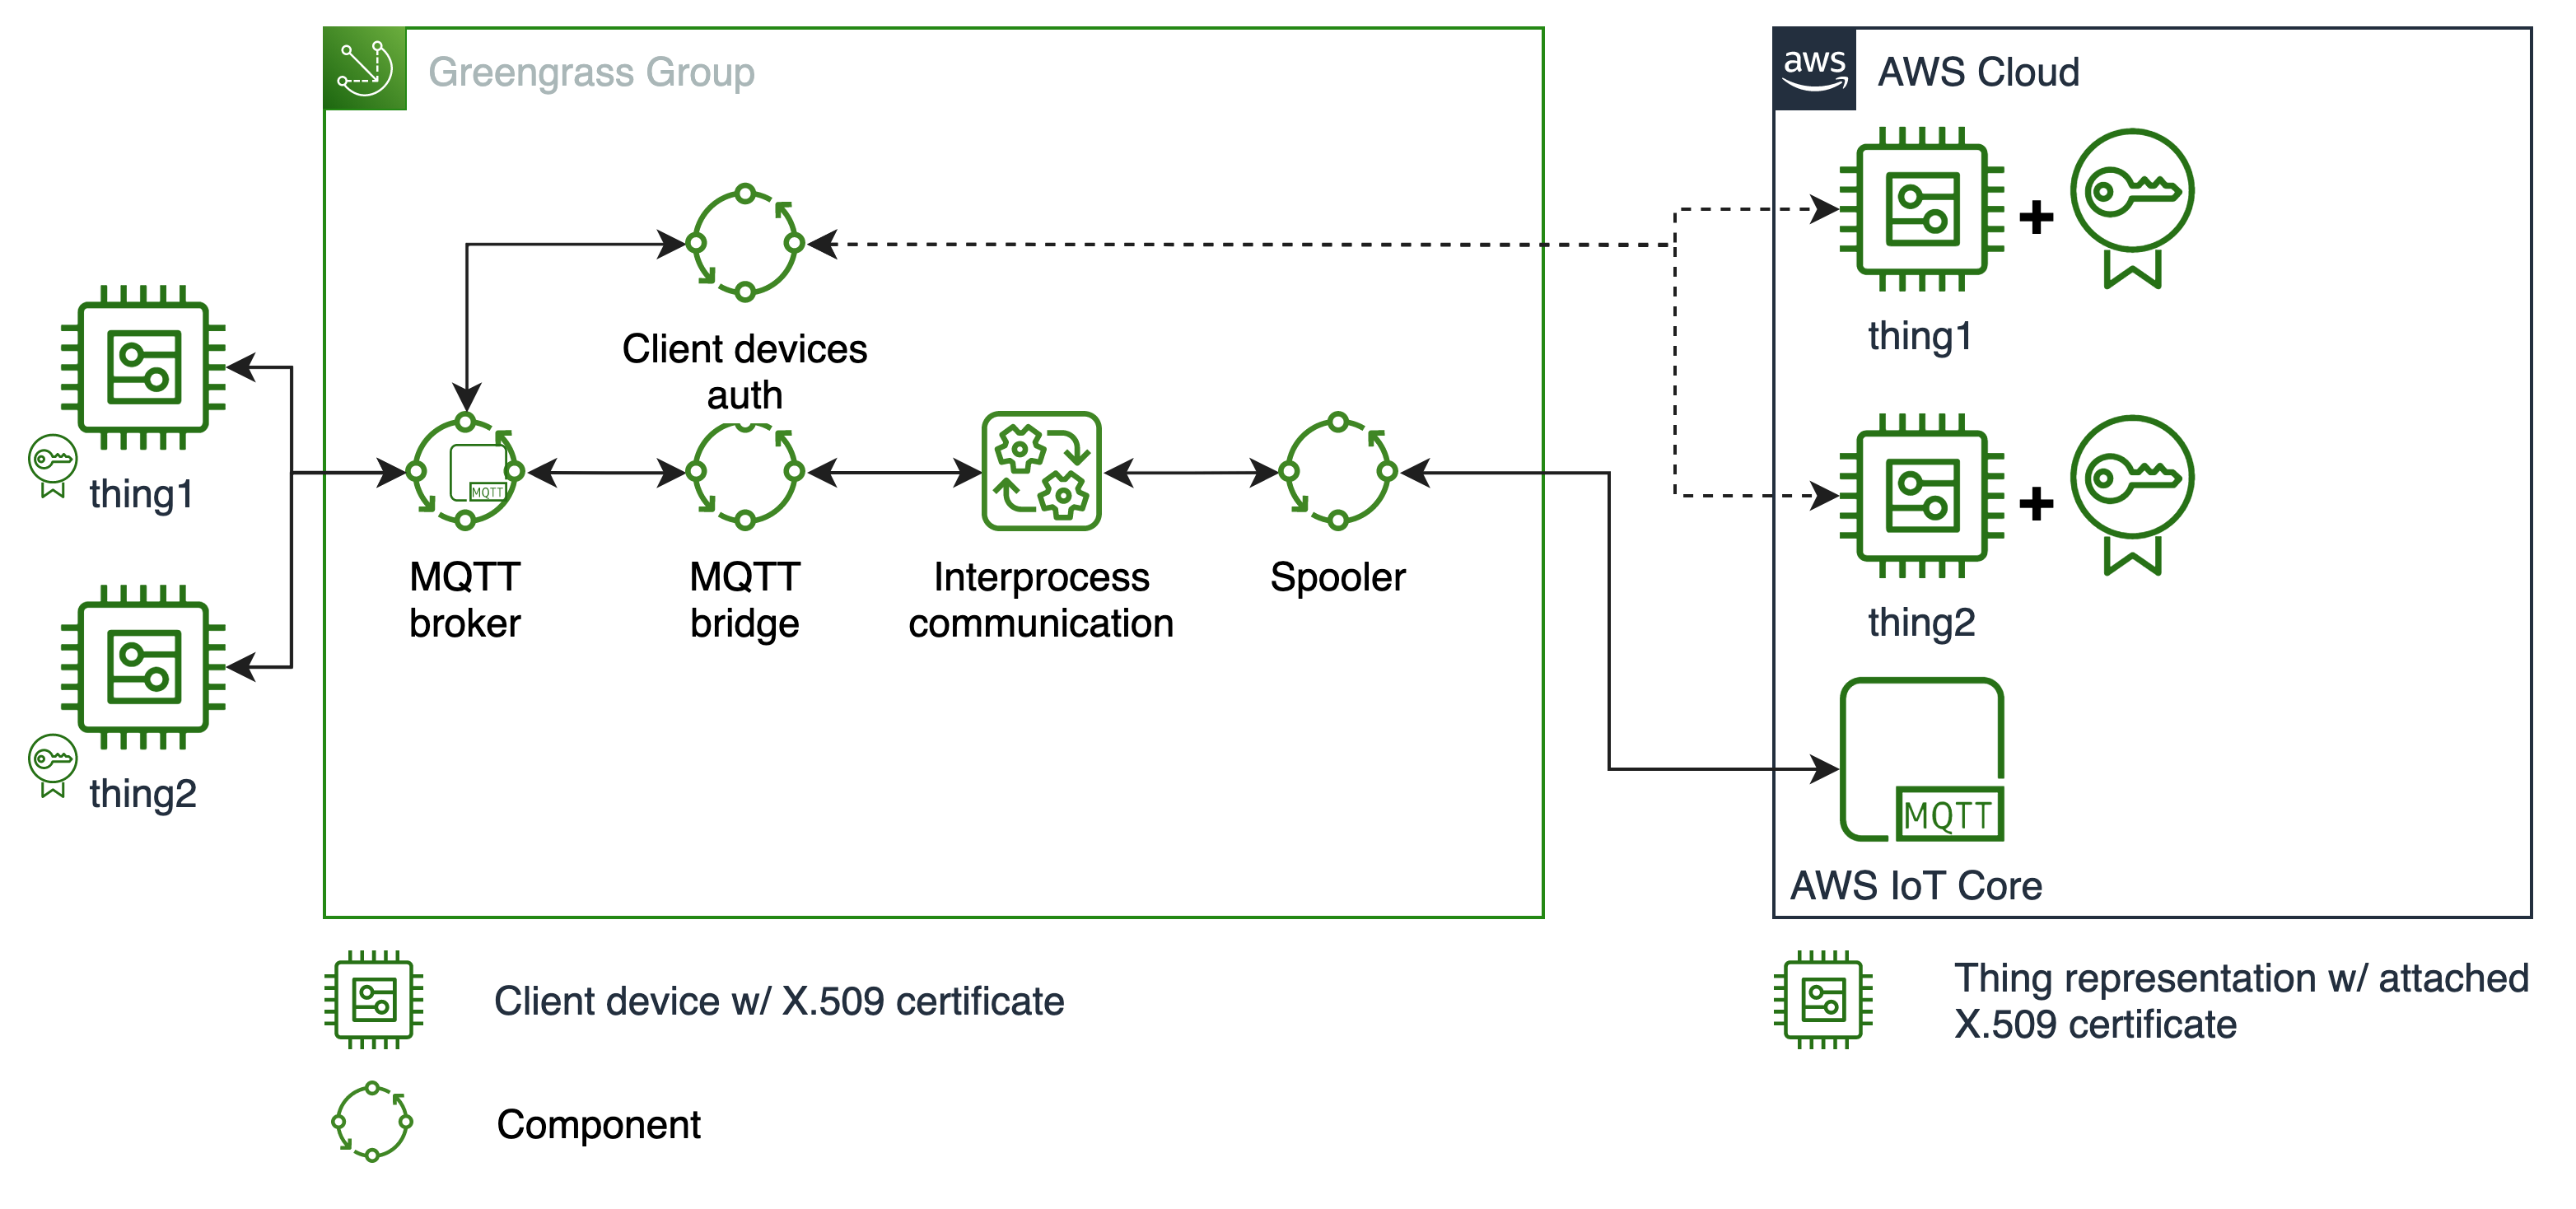
Why Use AWS for IoT Devices?
Let’s talk about AWS for a second. Amazon Web Services is like the Swiss Army knife of cloud computing. It offers a wide range of tools and services that make managing IoT devices a breeze. From data storage to real-time analytics, AWS has got you covered.
Read also:Jake Anderson Deadliest Catch The Untold Story Of A Resilient Fisherman
But why use AWS specifically? Here are a few reasons:
- Scalability: AWS can handle thousands—or even millions—of IoT devices without breaking a sweat.
- Security: With built-in firewalls, encryption, and identity management, AWS provides robust protection for your devices.
- Cost-Effective: AWS offers a free tier that’s perfect for small-scale projects, making it accessible for hobbyists and startups alike.
- Integration: AWS easily integrates with other services, allowing you to build complex IoT setups with minimal effort.
So, if you’re looking for a reliable and affordable way to manage your IoT devices, AWS is definitely worth considering. Plus, with its free tier, you can experiment without worrying about costs.
Setting Up AWS for IoT Devices
Now that we’ve covered the basics, let’s dive into setting up AWS for your IoT devices. Here’s a quick rundown of the steps:
- Create an AWS Account: If you don’t already have one, head over to the AWS website and sign up for a free account.
- Enable IoT Core: Once your account is set up, navigate to the IoT Core service and enable it. This will allow you to manage your devices through AWS.
- Register Your Device: Use the AWS IoT Device SDK to register your device and generate the necessary certificates and keys.
- Set Up Rules: Configure rules to define how your device interacts with AWS services. This could include sending data to a database or triggering alerts based on specific conditions.
It might sound like a lot, but trust me, it’s not as complicated as it seems. AWS provides detailed documentation and tutorials to guide you through the process.
Configuring Your Mac for IoT Access
Alright, let’s talk about the elephant in the room: your Mac. If you’re running macOS, you’ll need to configure your system to allow secure access to your IoT devices. Here’s how:
Step 1: Update Your Firewall Settings
macOS comes with a built-in firewall that you can configure to allow specific types of traffic. To do this:
- Go to System Preferences > Security & Privacy > Firewall.
- Click the lock icon and enter your password to make changes.
- Enable the firewall and check the box for “Allow incoming connections.”
- Add exceptions for specific applications or ports that your IoT devices use.
This will ensure that your Mac can communicate with your IoT devices without being blocked by the firewall.
Step 2: Use SSH for Secure Access
SSH (Secure Shell) is a protocol that allows you to securely access remote devices. To use SSH on your Mac:
- Open Terminal and type
ssh username@device_ip, replacingusernameanddevice_ipwith the appropriate values for your device. - Enter your password when prompted.
- Once connected, you can interact with your device as if you were physically there.
SSH is a great way to ensure secure access to your IoT devices, especially when working behind a firewall.
Free Tools for Managing IoT Devices
Now, let’s talk about some free tools that can help you manage your IoT devices without spending a dime. Here are a few options:
- MQTT Explorer: A lightweight tool for testing and managing MQTT-based IoT devices.
- Postman: A powerful API client that can help you interact with AWS services and test your IoT setup.
- Node-RED: A visual programming tool that simplifies the process of connecting IoT devices to AWS.
These tools are all free and can be incredibly useful for managing your IoT devices. Plus, they integrate seamlessly with AWS, making them perfect for this kind of setup.
Why Choose Free Tools?
Using free tools doesn’t mean sacrificing quality. In fact, many of these tools are just as powerful as their paid counterparts. Plus, they’re a great way to experiment and learn without committing to expensive subscriptions.
Best Practices for IoT Security
Security should always be a top priority when working with IoT devices. Here are a few best practices to keep in mind:
- Use Strong Passwords: Never use default passwords for your devices. Always set strong, unique passwords.
- Enable Two-Factor Authentication: Add an extra layer of security by enabling two-factor authentication wherever possible.
- Keep Software Updated: Regularly update your devices and software to patch any vulnerabilities.
- Monitor Traffic: Keep an eye on network traffic to detect any suspicious activity.
By following these best practices, you can ensure that your IoT devices remain secure and protected from potential threats.
Common Security Threats to Watch Out For
While IoT devices offer incredible convenience, they also come with their own set of security risks. Here are a few common threats to watch out for:
- Brute Force Attacks: Hackers attempting to guess your passwords through trial and error.
- Man-in-the-Middle Attacks: Intercepting communications between your device and the network.
- Malware: Infecting your devices with malicious software to gain unauthorized access.
Staying informed about these threats and taking proactive measures can help you stay one step ahead of potential attackers.
Conclusion: Taking Action
Alright, we’ve covered a lot of ground here. From understanding firewalls and AWS to configuring your Mac and securing your IoT devices, you now have the knowledge and tools to take control of your IoT setup. Remember, the key is to strike a balance between security and accessibility, ensuring that your devices remain protected while still being easy to manage.
So, what’s next? Here’s what I want you to do:
- Leave a comment below sharing your experience with IoT and AWS. What challenges have you faced? What solutions have worked for you?
- Share this article with someone who might find it helpful. Knowledge is power, and spreading the word can make a big difference.
- Explore some of the free tools and resources mentioned here. Experiment with them and see how they can enhance your IoT projects.
Thanks for reading, and remember: the world of IoT is full of possibilities. With the right tools and mindset, you can unlock its full potential. Until next time, stay curious, stay secure, and keep building!
Table of Contents
Article Recommendations